Product DescriptionPVDF series pressurized UF membrane modules use
imported PVDF raw material, filtering precision is 0.1micron,
ultrafiltrate turbidity ≤1NTU. Outside-in structure is applicable
for raw water with high turbidity andSS. External surface area of
outside-in membranes is large and feasible to air washing or
air-water back-washing, which greatly increases the anti-fouling
ability of membrane modules. TMP of PVDF outside-inmembrane modules
is low, which greatly reduces energy consumption.IGFUFF160 membrane
module is installed with hollow membrane filament with inner
diameter of 0.8mm and outer diameter of 1.3mm, and the filtration
method is internal pressure type, i.e. the raw water enters into
the inner part of the hollow filament first, and then is driven by
the pressure difference, and then permeates through the filament
along the radial direction from the inner to the outer part, which
can filter out all kinds of bacteria, colloids, suspended matter,
microorganisms and other harmful substances in raw water.It can
filter out all kinds of bacteria, colloid, suspended solids and
microorganisms and other harmful substances in the raw
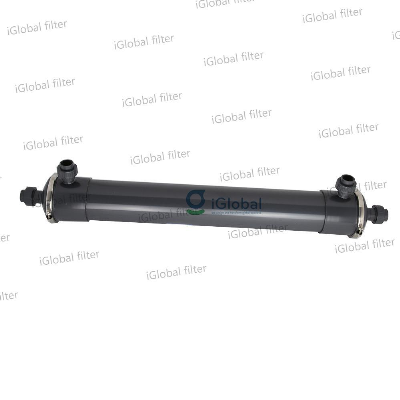
water. Product ParametersIGFUFF160 technical
detailsModel IGFUFF160StructureExternal pressure typeMembrane
materialModified PVDFCut molecular weight200000 DaltonNominal
membrane area40m2Filament diameter ID0.8mm,OD 1.3mm Out
sizeφ250mm×1810mmConnection sizeDN40 Pure water
flux8000L/H(0.15MPa, 25ºC) Product Features★ High
filtering precision: can reach 0.01μm★ High pure water flux:
500L/m.h★ High porosity: >95%★ High
strength:>300CN, 30% higher than other NIPS PVDF in
themarket★ Long service life: Use imported PVDF raw
material, which has
goodchemical resistance, good hydrophilicity,
anti-agingability,
long service life. Application★ Treatment of
surface water & ground water ★ Municipal drinking water
treatment ★ Reuse of industrial wastewater ★ RO
pretreatment Detailed Photos Plant
photo Packaging & ShippingCustomer site Certification and
test report FAQ---Replace the filter cartridge step1. Receive
the production instruction to replace the cartridge and confirm
that the system has stopped running.2. Prepare the appropriate
filter element (specification, material, size, O-ring material,
type, etc.), disassembly tools, collection bucket, rags, etc.;
and3. Thoroughly clean the filter housing, empty around the filter,
and leave the operation area. Take protective gears with you.4.
Disconnect the filter to be replaced from the system. Slowly open
the exhaust port at the top of the filter and depressurise it,
paying attention to safety in the process to prevent material or
liquid from splashing.5. Empty the material in the filter, open the
filter cover with a tool, take out the filter cartridge, and pack
the cartridge in a plastic bag to be scrapped; 6 Use clean tools
and rags to clean the filter.6. Use clean tools and rags to clean
the inside of the filter and install the new cartridge.7. Open the
plastic bag at the open end of the filter element and check whether
the O-ring is intact and in place.8. Install the inflow of
materials according to the method of inflow from the outside of the
filter element and outflow from the inside of the filter element.9.
with the appropriate wetting agent (such as water) wet O-ring and
cartridge seat jack, hand-hold the cartridge near the end of the
O-ring, vertically insert the cartridge cartridge socket completely
into the cartridge seat jack, the cartridge inserted, remove the
cartridge bag, and then install the metal cover, with tools to
tighten the filter; 10 close the filter drain port, open the
plastic bag, open the filter, the filter is complete, in place.10.
Close the liquid discharge port of the filter, open the bleeder
valve at the top of the housing, slightly open the inlet valve, so
that the material enters the housing until the liquid overflows
from the bleeder valve at the top of the housing, at this time
close the bleeder valve. Pay attention to check the disassembly
place, whether there is leakage;.11. Slowly open the filter outlet
valve until it is completely open. Indicates that the replacement
is complete.12. Remove the tools used for replacement and cleaning
tools. Clean up the surrounding area.---Bag filter instalation
step 1. First of all, it is necessary to confirm whether the
accessories required for the installation of bag filter have been
prepared;2. Check the O-ring seal and the O-ring groove on the bag
filter in order to replace the accessories in time;3. When
installing the bag filter, it is necessary to place the bag filter
on the work station that needs to be filtered. After connecting the
inlet and outlet flanges or pipe teeth, fix the filter, smother the
exhaust port, or configure the exhaust valve, and the jacket type
connects the thermal insulation heat source;4. Slowly put the metal
mesh basket into the bag filter, so that the collar of the mesh
basket a
Quality UF Membrane PVDF Material 160 Series products, provide good price UF Membrane PVDF Material 160 Series from .
Related products about UF Membrane PVDF Material 160 Series
-
 Waste Tyre Plastic Recycling Machinery Machine Tire Crusher Production Line Rubber Crumb Grinding Machine Equipment Tire Shredder
-
 Stretch Plastic Blowing Pet Bottle Making Blow Molding Machine Bottles Stretch Automatic Pet Bottle Blowing Machine
-
 Waste Plastic Pet Bottle, Water Bottle Flake, PP/HDPE/LDPE PE Film Jumbo Woven Bags Plastic Crusher Machine, Plastic Crushing Washing Recycling Machine
-
 Type 2 Wall-Mounted Electric Car Charging Station 7kw /11 Kwelectric Vehicle Charging Station Home Wallbox AC EV Charger Single Phase or 3three Phase
-
 G-View G12W Wholesale Auto Car LED Headlight Bulb High Power H13 H11 9005 H7 H4 Car LED Headlights LED Car Lights
-
 New Design Porcelain Round Plates Dinner Set for Wedding and Banquet
-
 China 2023 New Design Super Soft 100% Polyester Microfiber Knitted Oversized Decoration Hoodie Blanket
-
 Handmade Art Creative Materials Thickened White Paper Cup DIY Disposable Handmade Colored Paper Cup


